Understanding Automotive Base Coat Paint
Automotive base coat paint is the colored layer applied over the primer and beneath the clear coat. It provides the vehicle’s color and visual effects, such as metallic or pearl finishes. Unlike single stage paints, base coat systems rely on a separate clear coat to provide gloss and protection. This two stage approach offers better durability, richer color depth, and easier repair if damage occurs later.
Before starting, it is important to select a high quality product. Not all paints are created equal, and investing in reputable brands often leads to better coverage, easier application, and more consistent color. Many professionals recommend researching paint systems that are compatible with your primer and clear coat to avoid adhesion issues.
Tools and Materials You Will Need
Preparation starts with gathering the right tools and materials. Having everything ready before you begin helps maintain efficiency and consistency throughout the process.
You will need automotive base coat paint, compatible reducer or thinner, a quality spray gun, air compressor with a moisture trap, mixing cups, strainers, tack cloths, clean rags, masking tape, plastic sheeting, and personal protective equipment. Safety gear should include a respirator rated for paint fumes, gloves, and eye protection.
A clean, dust free workspace is equally important. Whether you are working in a garage or a professional spray booth, controlling dust and airflow will significantly affect the final result.
Surface Preparation Before Painting
Surface preparation is one of the most critical steps in applying automotive base coat paint. Skipping or rushing this stage often leads to peeling, uneven color, or visible imperfections.
Start by thoroughly washing the vehicle to remove dirt, grease, and contaminants. Follow this with a wax and grease remover to eliminate residues that can interfere with paint adhesion. Once the surface is clean, sand the entire area to be painted. Typically, a grit range between 400 and 600 is ideal for preparing a primed surface.
After sanding, wipe down the vehicle with a clean cloth and use a tack cloth to remove any remaining dust. Mask off areas you do not want painted, such as windows, trim, and lights. Proper masking ensures clean edges and reduces cleanup time later.
Mixing the Base Coat Paint Correctly
Mixing your paint correctly is essential for consistent color and proper atomization through the spray gun. Always follow the manufacturer’s recommended mixing ratio for paint and reducer. These ratios are designed to optimize flow, drying time, and coverage.
Use a clean mixing cup and stir the paint thoroughly. Strain the mixture before pouring it into the spray gun cup to remove any particles that could clog the nozzle or create imperfections on the surface.
Temperature and humidity can affect how the paint sprays and dries. Adjust the reducer speed according to your working environment to maintain optimal performance.
Setting Up the Spray Gun
Proper spray gun setup plays a major role in achieving even coverage. Begin by adjusting the air pressure according to the paint manufacturer’s specifications. Too much pressure can cause overspray and dry spray, while too little pressure can lead to uneven application.
Set the fan pattern to create a wide, even spray. Test the spray pattern on a piece of cardboard or scrap panel before applying paint to the vehicle. This allows you to fine tune settings and ensure consistent atomization.
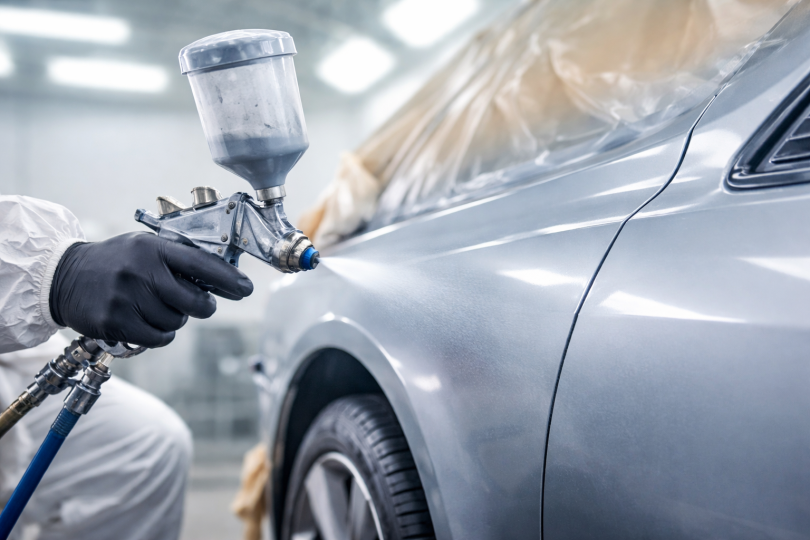
Applying the First Coat
When applying the first coat of automotive base coat paint, the goal is coverage, not full color saturation. Hold the spray gun approximately six to eight inches from the surface and move in smooth, overlapping passes. Maintain a consistent speed and distance to avoid streaks or blotches.
Apply the paint in thin, even layers. A light to medium coat helps establish a foundation and reduces the risk of runs or sags. Allow the paint to flash according to the manufacturer’s recommended time before applying the next coat.
Building Color with Additional Coats
After the first coat has flashed, apply subsequent coats to build color depth and uniformity. Most base coat systems require two to three coats, though some colors may need additional passes for full coverage.
Continue using overlapping strokes and consistent movement. Pay close attention to panel edges and contours, as these areas are easy to miss or oversaturate. Allow proper flash time between each coat to ensure solvent evaporation and prevent defects.
If you notice minor imperfections such as dust nibs, allow the paint to flash and lightly address them before proceeding. Avoid heavy sanding at this stage, as it can disrupt color consistency.
Inspecting the Base Coat Before Clear Coat
Once the final base coat has been applied and flashed, inspect the surface under good lighting. Look for uneven color, striping, or missed spots. The finish should appear uniform and matte, without glossy patches.
Do not touch the surface with bare hands, as oils can contaminate the paint. If corrections are needed, address them carefully before moving on to the clear coat stage.
Common Mistakes to Avoid
Many painting issues stem from rushing the process or ignoring environmental factors. Common mistakes include applying coats too heavily, insufficient flash time, improper gun setup, and poor surface preparation.
Another frequent error is neglecting compatibility between products. Always ensure your primer, base coat, and clear coat are designed to work together. This helps prevent adhesion problems and premature paint failure.
Long Term Benefits of Proper Base Coat Application
Taking the time to apply automotive base coat paint correctly pays off in the long run. A properly applied base coat enhances color vibrancy, improves durability, and provides a strong foundation for the clear coat. This not only improves the vehicle’s appearance but also helps protect it from environmental damage.
For those looking to learn more about paint systems and materials, resources like auto base coat paint guides can provide additional insights into product selection and best practices.
Frequently Asked Questions
How long should automotive base coat paint dry before clear coat?
Base coat paint typically needs to flash for 15 to 30 minutes between coats and around 30 to 60 minutes before applying clear coat. Always follow the manufacturer’s recommendations, as drying times can vary based on temperature and humidity.
Can I apply base coat paint without a spray booth?
Yes, it is possible to apply base coat paint in a home garage, but cleanliness and ventilation are critical. Proper masking, dust control, and safety equipment are essential to achieve good results.
How many coats of base coat paint are needed?
Most vehicles require two to three coats of base coat paint for full coverage. Some colors, especially lighter or metallic shades, may need additional coats.
What happens if I apply the base coat too thick?
Applying the base coat too thick can cause runs, sags, and solvent trapping. This can lead to uneven color and adhesion issues later. Thin, even coats are always recommended.
Is sanding required between base coat layers?
Sanding between base coat layers is generally not necessary unless there are imperfections. If sanding is required, it should be done very lightly and carefully.